Recently I upgraded to Windows 8 on my Lenovo W510 in order to setup a virtual lab in Hyper-V. Hoping to save others the frustration I experienced during BIOS configuration, I thought I'd share the Intel hardware virtualization settings necessary for the role. The order that settings are made and complete power downs after certain settings changes are significant. Don't save time with warm boots!
Step 1. Boot the machine, press F1 to enter setup, and you'll be presented with this menu. Make sure that the BIOS is the most recent version (1.45 as of this post). Press enter on Config.
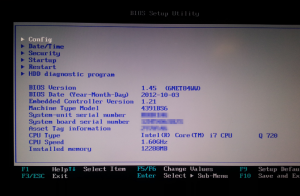 BIOS top level menu
Step 2. In Config menu, arrow down to CPU and press enter.
 Config Menu on Lenovo W510 BIOS
Step 3. In the CPU menu, make sure the settings are:
• Intel Hyper-Threading = Enabled
• Intel Virtualization Technology = Enabled
• Intel VT-d Feature = Enabled
 Hardware Virtualization BIOS Settings on Lenovo W510
If any settings in Step 3 had to be changed, hit F10 to save the settings and then power the machine off. Re-enter the BIOS by pressing F1 on the next startup.
Step 4. Return to the Main Menu in Step 1, and select Security. This menu will appear.
Arrow down to Memory Protection and press enter.
 Security Menu on Lenovo W510
Step 5. In Memory Protection, make sure Execution Prevention is set to Enabled
Press ESC to return to the Security menu from Step 4
 Memory Protection BIOS Settings on Lenovo W510
Step 6. Confirm the following settings:
• Security Chip = Active
• Intel TXT Feature = Disabled
 Security Chip BIOS Settings on Lenovo W510
Press F10 to save settings, and power down the machine. After restart, the Hyper-V role can be installed.