Guest post by Corey Blackwell, a Technical Coordinator at Lewan.
The Problem
A client was hit with ransomware. Their RDS server was accessed from outside the network via an unsecure service account. The service account allowed the attacking party to execute a malicious program designed to encrypt any files it could access. Due to the security settings of the network shares, the ransomware was able to encrypt files in shares of two separate servers. Luckily, the company’s anti-virus stopped the ransomware before it was able to complete the encryption, however, the cryptoware was able to encrypt over 680,000 files totaling 228GB of information before it was stopped.
If this happens to your organization and a ransomware attack does get through, here is how to recover from an attack after the security flaws are fixed.
The Restore
To help explain the technical environment of this restore I want to note that this customer has the Barracuda backup system backing up all files on this server. The server is hosting many file shares, and has a lot of proprietary documentation that has been affected. Due to the nature of the affected documents, it was almost a week after the attack before the affected files on this server were discovered.
Step 1: Information Gathering
- What server(s) are affected?
- Can you do a flat restore and replace all data in the affected folder(s)?
- What is the total size of the affected data?
- Will it be easier to manually restore the files or is there to much data to do individual restores?
- Where on the drive is the affected data?
- Can you narrow the affected files down to a single share or sub directory?
- Is the server a VM or a physical server?
- Do you have enough space to restore the affected folder?
- If you have a VM, does your ESXi datastore have enough space to create or expand a drive to accommodate the entire restored share or subdirectory?
- If this is a physical server, does the server have enough space to accommodate a restore of the entire drive (or affected shares/folder) or can storage be added/attached to the server to accommodate the restore?
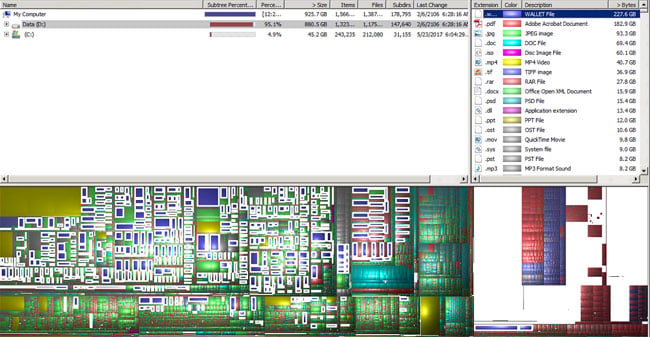
To help find a lot of this information, I recommend using WinDirStat as shown:

In this case, the server is a VM and the only affected folder was a single network share (albeit with almost 700GB of information in it). Out of the 700GB only 228GB were affected. Unfortunately, these files were discovered several days after the ransomware was discovered. Due to this, we couldn’t just restore everything from the previous week due to the users’ working on and adding to the other unaffected 472GB of files in the interim.
Step 2: Restoring the Folder
Once we gather all of the requested information, the first thing we need to do is restore the folder of the affected files to an alternate location from a date prior to the files being affected. In this case all of the affected files were in the “Shared Folder” network share. So 700/880gb will be restored to an alternate location. To make it easier, I used VMware to create a new drive for the VM (labeled “Z:\”) and restored the 700GB directory to the new drive.
Step 3: Delete the Affected Files
In this case, it was a .wallet file.
I used the following commands to complete this operation. You only have to use one or the other depending on your preference of command line.
CMD:
Del /S D:\*.wallet
PowerShell:
Get-ChildItem D:\ -include *.wallet –recurse | foreach ($_) {Remove-Item $_.fullname}
To break both of these commands down, replace “D:\” with the affected drive and “wallet” with the file extension you’re trying to delete.
Step 4: Copy the Missing Files
In this case, we’ve already deleted any affected files and the users have been working on the unaffected files. So we don’t want to replace anything that already exists on the production drive.
Once the restore is complete, we will use the robocopy command to copy the restored files from the “Z:\” drive back to the original location without affecting any files that already exist.
The command to do so is:
IMPORTANT NOTE: Test this command on a small scale before attempting to replace any production files
robocopy Z:\ /copyall /s /xc /xn /xo /v /log:C:\WalletFileRestore.txt "D:\Shared Folder”
The command breakdown:
Z:\ = The source of the files to be copied.
/copyall = Flag to keep the original file information.
/s = Includes subdirectories (excluding empty subdirectories. Use the /e flag if you would like to include empty sub directories).
/xc = Ignore any changed files.
/xo = Ignore any older files.
/xn = Ignore any new files.
/v = Enables verbose logging (very important for finding what files were skipped/replaced).
/log: = Where the log will be created. Replace anything in bold with the file path that you would like the log to be placed.
“D:\Shared Folder” = Destination folder for the files being copied.
For more triggers and options, please see this Microsoft technet article listing out all of the capabilities of robocopy.
Is your business's data and sensitive information safe  for a consultation and learn more about how our security solutions can protect you and your end users from data, email, internet and mobile security threats.


