<img src="//bat.bing.com/action/0?ti=5794969&amp;Ver=2" height="0" width="0" style="display:none; visibility: hidden;">

LabTech Reboot Messages

[fa icon="pencil'] Posted by Bruce Morgan [fa icon="calendar'] June 10, 2013 [fa icon="tags'] Managed Services, How To Guide, Microsoft Windows

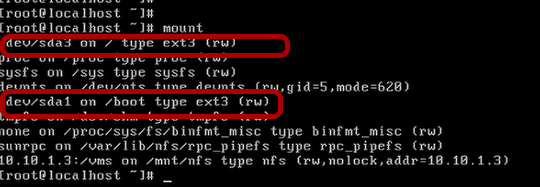
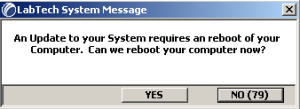
If you are one of our Managed Services customers, one of the services provided to you is scheduled patching of your computers . Microsoft releases patches on a regular basis as do some other application vendors and our remote management software (LabTech) will apply these patches to your machines as needed and as approved by our staff.

Read More [fa icon="long-arrow-right"]

Using Asigra DS-Client Logs

[fa icon="pencil'] Posted by Doug Oakes [fa icon="calendar'] May 31, 2013 [fa icon="tags'] Managed Services, Data Backup & Recovery, How To Guide

How to understand backup operations using the DS-Client logs

For Lewan Managed Data Protection customers wanting additional information beyond what is available in the daily or weekly reports, the Asigra software provides the ability to look at the DS-Client activity logs. This post assumes that the user has installed or been given access to the DS-User interface and is able to connect to their DS-Client server.
A previous blog post (http://blog.lewan.com/2012/03/29/asigra-ds-user-installation-and-log-file-viewing/) addressed the installation of the DS-User along with some basics on the activity logs. This post will provide additional detail regarding the data provided by the activity logs.

Open the DS-User interface and connect to the appropriate DS-Client

From the menus select "Logs" and open the "Activity Log"

Set the parameters for logs desired

By default the system will display all logs for the current and previous days. For this exercise only backup activity will be required. The date and time range as well as specific nodes (backup clients) or backup sets can also be selected.
Once all options have been set, click the "Find" button to locate the specified logs.

Backup windows

For each set backed up, the start time, end time and total duration of the backup job can be observed. Each column can be sorted to assist in viewing.

On line Data Changed

The column labeled "Online" indicates to total size of changed files for the backup. That is the total amount of space used by all files which had any chage since the last backup session. For example a server with a 30 GB database which has daily updates and 4 new 1 MB documents would show 32,216,449,024 (30 GB + 4 MB). This is the amoutn of data copied from the backup client to the DS-Client.

Data Transmitted to the cloud

The column labeled "Transmitted..." shows the actual amount of data changed and copied to the cloud based device. This is the amount of data contained in changed blocks from all of the changed files, after compression and encryption. If, in the example above, the database file only had 1 MB of changes the Transmitted column would contain a number similar to 5,242,880 (roughly 5 MB).

Determining error and warning causes

In some cases a backup set will show a status of "Completed with Errors" or "Completed with Warnings". In most cases the errors and warnings are inconsequential but should usually be looked at.
Select the line containing the backup set in question and click on the "Event Log" button

Backup Session Event Log

Each event in the backup session is listed in the log. Errors are flagged with a red 'X' and warnings with a yellow '!'. Selecting the event will show the detail. In the example shown above a file is stored for which the backup user does not have permission to read the file. Other common errors are due to a file being used by another process and a file which has been moved or deleted between the initial scan of the file system and the attempt to access it for backup.
In some cases there will be a large number of errors "The network name cannot be found." These usually indicate that there is a problem with the network connection between the DS-Client and the backup target but could be caused by a reboot of the backup target or other connectivity issues.

For our Managed Data Protection customers, the Lewan Operations team checks backup sets for errors on a daily basis and will correct any critical issues.

Additional analysis

The activity log can also be saved to a file (text or Excel spreadsheet) for additional analysis. Right-click anywhere in the activity log and select "Save As". Used the resulting dialog to configure the location and file type.


Read More [fa icon="long-arrow-right"]

Using a VLOOKUP in Excel to Simplify Large Data Searches

[fa icon="pencil'] Posted by Lewan Solutions [fa icon="calendar'] July 13, 2012 [fa icon="tags'] How To Guide

This post covers a very handy formula in Excel, the VLOOKUP. The VLOOKUP can radically simplify processing between two separate spreadsheets with lots of data that needs to be compared. Working in an operations environment, this can be a real life saver! Here's an example: I generally use this function when comparing device inventories from several different people. Everyone has a slightly different set on information based on their perspective and job function, and I need a master list that satisfies everyone. (Or anyone--no one really reads spreadsheets anyways...)

Enough of the description, on to the details.

Read More [fa icon="long-arrow-right"]

How to Make a Bootable USB Stick from an ISO File on an Apple Mac OS X

[fa icon="pencil'] Posted by Lewan Solutions [fa icon="calendar'] February 10, 2012 [fa icon="tags'] Apple, How To Guide

This quick step by step will show you how to make a bootable USB stick from a downloaded ISO image file using an Apple Mac OS X.

Read More [fa icon="long-arrow-right"]

P2V Conversion of Linux Virtual Machine (for XenServer)

[fa icon="pencil'] Posted by Lewan Solutions [fa icon="calendar'] April 14, 2011 [fa icon="tags'] Citrix XenServer, Linux, How To Guide

With XenServer 5.6 Citrix removed the old Linux P2V tool which was included in earlier versions of XenServer. The old version 5.5 tool will not work with XenServer 5.6, and only supported older distributions.

Read More [fa icon="long-arrow-right"]

Backing Up ESX and vSphere Host Configurations with the Host Profile Feature

[fa icon="pencil'] Posted by Lewan Solutions [fa icon="calendar'] May 5, 2010 [fa icon="tags'] VMware, How To Guide

Back before vSphere, some very creative people/companies created utilities to backup all of the host configuration on your ESX servers. Things like Networking configuration, vSwitch configuration, Port groups, etc. Now with vSphere, how do you protect this information in case of a host failure/reinstall? Answer: Host Profiles.

Read More [fa icon="long-arrow-right"]

How to Fix Invalid/Greyed Out Virtual Machines in VMware vSphere Client

[fa icon="pencil'] Posted by Lewan Solutions [fa icon="calendar'] December 23, 2009 [fa icon="tags'] Virtualization, VMware, Data Storage, How To Guide, Networking, Disk Performance, VMware vSphere, VMware vCenter

If there are disk array or networking issues in VMware ESX 3.x or vSphere, some virtual machines (VMs) may appear in the vSphere Client as being Invalid and are greyed out. The following steps will fix this issue.

Read More [fa icon="long-arrow-right"]

How to Use VMware Converter to Import VM's or VMDK's into vSphere

[fa icon="pencil'] Posted by Lewan Solutions [fa icon="calendar'] December 22, 2009 [fa icon="tags'] Virtualization, VMware, How To Guide, VMware vSphere, VMware vCenter

When using Virtual Machines (VM's) from other VMware products, the easiest way to get these VM's into ESX/vSphere is to use VMware's product called vCenter Converter Standalone. vCenter Server does include a version of Converter, however I've had better success in using the standalone version to do VM conversions as it is (typically) a newer version with more features than the one included with vCenter. This lesson describes how to use vCenter Converter Standalone to import VM's or VMDK files from other VMware Products, such as VMware Fusion, VMware Workstation and VMware Server.

Read More [fa icon="long-arrow-right"]

How-To : Running the vSphere 4 Client on Microsoft Windows 7 (RTM/Retail)

[fa icon="pencil'] Posted by Lewan Solutions [fa icon="calendar'] October 22, 2009 [fa icon="tags'] How To Guide

Running the VMware vSphere 4 client on a Windows 7 machine just doesn't seem to work. After the Windows 7 RTM version was released, we could use the vSphere Client to connect to an ESX 3.5 host with no problems. However you still cannot connect to a vSphere 4 host. This lesson describes how to "fix" this issue with a workaround that was presented on the VMware Community Forums (thanks to all on that post!). This is a simple and concise way of implementing the "fix" without having to do a lot of changes to your system (some other blogs have shown the more "difficult" route to accomplish this same thing). What is nice about this method is that it's easily removable and doesn't change any system settings permanently.

The Error

Here I will show the error when connecting our vSphere client to a vSphere 4 server.

Here is a screenshot of the error. It reads:
Error parsing the server "192.168.70.199" "clients.xml" file. Login will continue, contact your system administrator.
When you click on the "Ok" button, you will get the following error.

This error reads:
The type initializer for 'VirtualInfrastructure.Utils.HttpWebRequestProxy' thew an exception.

The Workaround Fix

We have pre-packaged the files that are needed to "fix" (e.g. workaround) this issue.

Download only ONE of the files below per the version of Windows 7 you are using (e.g either 32bit or 64bit).

http://lewanps.files.wordpress.com/2009/10/viclient4_fix_win7-x32-zip.doc (for 32bit)
http://blog.lewan.com/wp-content/uploads/2009/10/viclient4_fix_win7-x64-zip.doc (for 64bit)

Our blog system won't allow .zip files so I renamed the files to .doc. Once you download correct file above, RENAME the file to end in a .zip extension and then proceed with the next steps below.

Once you have renamed the file, right click on the file and select "Extract All".

Next, extract the files to the location below:
For 32bit, extract to: C:Program FilesVMwareInfrastructure
For 64bit, extract to: C:Program Files (x86)VMwareInfrastructure
In our screenshot, we're extracting to a 32bit system.
Check the box that says to "Show extracted files when complete".

You will get a few "Confirm Folder Replace" options. Check the box that says "Do this for all current items" and then click on the "Yes" button to continue.

Now select the "Do this for the next conflicts" checkmark. Then select the "Copy and Replace" option. We are basically replacing 2 simple configuration files for the vSphere client and for Update Manager. The changes are simple and easy to remove once this issue has been resolved by VMware.

Next select the checkmark for "Do this for all current items" and then select the "Continue" button. Windows is asking for "admin level" permission to replace the files that we told it to in the previous step.

New Program Links

After the extraction happens, a box will appear like the one in the screenshot. The two links for the vSphere Client and for the vSphere Update Client are NEW links that will need to be used to launch either program. Feel free to copy these links to your desktop or Start Menu. You MUST use these new links in order for the clients to work.

Connected!

Launch the vSphere Client using the link described in the previous step. Type in your vSphere Servers' IP address, your login and password, and viola! you should now connect. Once connected, you can click on the "Inventory" link to see the vSphere server.

Here is your vSphere server, using the vSphere Client on Windows 7!

Read More [fa icon="long-arrow-right"]

How-To: Make ISO's from the ESX/vSphere Service Console

[fa icon="pencil'] Posted by Lewan Solutions [fa icon="calendar'] July 11, 2009 [fa icon="tags'] How To Guide

Since you can mount ISO files as a “CDRom Device” inside VM’s, the common question that normally will come up is, “How do I make ISO files from my existing CD’s?” There are a number of ways to do this however you can use ESX to make the ISO images and then store them either locally on the ESX server or on a SAN attached VMFS. I would recommend putting them on a SAN attached VMFS volume so all of your ESX servers can access them.

Connect via SSH and Make ISO

The first step is to put the CD in the physical CD reader on the ESX hardware.

Now, SSH into the ESX server (as described under "Connecting via SSH/CLI" in this guide).
Next, type in the following command (also shown in the screenshot):

dd if=/dev/cdrom of=/vmfs/volumes/vmfs_name/filename_for_cd.iso

Replace "vmfs_name" with the actual name of your VMFS datastore.
Replace "filename_for_cd" with the actual name that you want to use for the ISO you are creating.

Browse for ISO

Now go to that directory where you pointed the “of” (or output file) and you should be able to see your ISO image as shown in the screenshot. Now you can use this ISO file as a CD-ROM device in your Virtual Machine by editing the properties of the virtual machine and pointing the CD to the datastore ISO you created.

Read More [fa icon="long-arrow-right"]

[fa icon="envelope"] Subscribe to Email Updates


[fa icon="comments-o"] Follow us

Get even more great content, photos, event info and industry news.


[fa icon="calendar"] Recent Posts